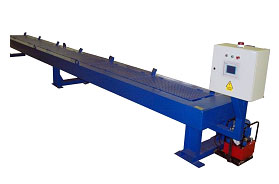
The stand is designed for tension testing of the freight car brake rigging rods. The stand is readjusted for different rod dimension types by means of various adapters application and rack travel.
Stand control system allows to make records of the following parameters in the electronic test log in automatic mode:
- Quality inspector stamp number;
- Number of the item under test;
- Date and time of the test;
- Test force;
- Deformation parameters.
Stand control system (by means of a display panel) can inform an operator about emerging faults – open cover, current and thermal protection operation, invalid deformation of the rods under test.
Operation principle: Brake rigging rods are put inside the stand by means of handling equipment according to the layout diagrams, and they are connected with each other by means of adapters and pins. After that the grid covers of the stand are closed for safety purposes. Then a command for initial strain of the obtained assembly is given to eliminate the gaps in the joints. Strain sensor and range-finding sensor readings are zeroed in this position. After that a rod tension test is performed by means of the operating force equal to 6 tons. Then a strain force drops to the initial one, and a residual deformation of a rod set is measured withthe help of the range-finding sensor. Then the force drops to a zero mark, which allows to release swivel pins and adapters, disassemble rods, which are taken off the stand with the crane after the test and transfered to the next working place.
Specifications:
| 1. | Name and designation of the items to be assembled | rods |
| 2. | Length of the rods under test, mm | 845…7000 |
| 3. | Number of rod dimension types | 8 |
| 4. | Drive type | hydraulic |
| Executive device | jack | |
| 5. | Load capacity, kg | 10000 |
| Rod working stroke,mm | 150 | |
| 6. | Tension measuring element | Strain gauge |
| Load capacity,kg | 10000 | |
| Measurement accuracy,kg | ±1,7 | |
| 7. | Residual deformation measuring element | Range-finding sensor |
| measurement range,mm | 100…600 | |
| measurement accuracy,mm | ±2 | |
| 8. | Hydraulic power units | |
| Drive power of the hydraulic power pack,kW | 0,55 | |
| Hydraulic reservoir capacity,l | 10 | |
| Rated consumption, l/min | 0,5 | |
| 9. | Stand type | readjusted |
| 10. | Stand control principle | manual, by means of buttons |
| 11. | Overall dimensions of hte stand, mm | 9800х1000х930 |
| 12. | Weight, kg | 2100 |
